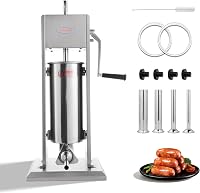
How to Use a Manual Sausage Stuffer
To use a manual sausage stuffer, load chilled ground meat into the cylinder, remove air pockets, fit the casing over the nozzle, and turn the crank slowly while guiding the link. Steady pressure and a properly prepared casing help prevent gaps and splits.
On this page (9 sections)
- What do you need before using a manual sausage stuffer?
- How do you load the cylinder?
- How do you attach the casing to the nozzle?
- How do you turn the crank for even filling?
- When should you use a smaller manual stuffer?
- Can a jerky gun fill sausage casings?
- How do you twist and portion the sausage?
- How do you clean and store a manual sausage stuffer?
- Which manual sausage stuffer should you choose?
To use a manual sausage stuffer, load chilled ground meat into the cylinder, remove air pockets, fit the casing over the nozzle, and turn the crank slowly while guiding the link. Steady pressure helps produce an even fill without stretching the casing too quickly.
A manual stuffer gives you direct control over the filling rate. Before you begin, prepare the meat mixture, casings, nozzles, a clean work surface, and a tray for the filled sausage.
What do you need before using a manual sausage stuffer?
You need prepared ground meat, soaked casings, a suitable nozzle, and a clean manual stuffer. A meat grinder can help you prepare the meat before stuffing, but the grinder and stuffer perform different jobs.
Keep the meat cold while you work. Cold meat is easier to handle, while warm or overly wet meat can be harder to push evenly through the nozzle.
Soak natural casings as directed for the casing type, then rinse them before use. Keep the casing moist while sliding it onto the nozzle so it does not tear from friction.
Choose the nozzle based on the casing diameter. If your stuffer includes several nozzle sizes, compare the opening with the casing before filling the cylinder.
Can a manual sausage stuffer replace a grinder?
A manual sausage stuffer fills casings, but it does not replace a grinder for chopping or preparing meat. If you already have a grinder, use it first to create the texture your recipe needs, then transfer the mixture to the stuffer.
An attachment can suit occasional batches, while a dedicated cylinder stuffer can make loading and cranking more direct. Compare sausage stuffer attachments for meat grinders if counter space or storage is limited.
How do you load the cylinder?
Load the cylinder in firm portions and press the meat down to reduce air pockets. Do not pack it so tightly that the piston cannot move smoothly.
Open the cylinder and add the meat mixture a little at a time. Press each portion toward the bottom and sides, especially around the area where air can collect.
Keep the cylinder below its working limit. Leaving a little room makes it easier to fit the piston and start the first crank without forcing the lid or handle.
Before closing the cylinder, inspect the meat surface for visible air gaps. Smooth the top, position the piston as directed by the equipment, and make sure the food-contact parts are seated correctly.
How do you attach the casing to the nozzle?
Slide the prepared casing over the nozzle while leaving a short section hanging free. Tie or close the end only after the casing is positioned and ready for filling.
Lubricate the nozzle with a little water if the casing drags. Avoid pulling the casing tightly over the full nozzle because it needs to move forward as the meat enters.
Keep the loose casing gathered near the nozzle tip. This gives you control over the first section and leaves room to decide how tightly to fill it.
A casing that splits at the start may be too dry, stretched too far, or filled too quickly. Stop the crank, remove the damaged section if needed, and restart with less pressure.
How do you turn the crank for even filling?
Turn the crank slowly and steadily while guiding the casing with your other hand. The crank controls the meat flow, while your guiding hand controls the shape and tension of the sausage.
Start with a small amount of meat in the casing. This first section shows whether the nozzle and casing size work together.
Keep the casing moving forward at a consistent pace. If the casing bunches up, pause the crank and loosen the gathered casing before continuing.
If the casing looks too loose, slow your guiding hand slightly or increase the crank speed only a little. If it becomes tight and shiny, pause and allow more casing to move forward.
Do not twist links immediately after a section that is overfilled. A casing under high tension can split when twisted.
How can you prevent air pockets?
Prevent air pockets by pressing the meat firmly into the cylinder, keeping the piston seated, and avoiding sudden changes in crank speed. Small pockets can also form when the casing is not held straight at the nozzle.
If air appears inside the casing, stop cranking and ease the casing forward. You can often redistribute the meat by gently moving the filled section before twisting.
A piston with an air-release feature can help reduce trapped air during filling. The Hakka 11 Lb/5 L Sausage Stuffer has a piston that includes an air release, along with a stainless steel cylinder and 4 stainless steel nozzles.
The Hakka model suits larger home batches or anyone who wants a vertical stainless steel stuffer with 2 fill rates. Its nozzles measure 16 mm, 22 mm, 32 mm, and 38 mm, giving you several casing-size options.
The larger 5 L capacity can reduce the number of refills compared with a smaller cylinder, but it also needs more storage space. Choose it when batch size and a stainless steel food-contact path matter more than compact storage.
When should you use a smaller manual stuffer?
A smaller manual stuffer suits shorter batches, limited counter space, and readers who want to refill the cylinder more often rather than manage a larger load. The working routine stays the same: pack the meat, seat the piston, attach the casing, and crank slowly.
The Hakka 7Lb/3L Sausage Stuffers and Vertical Sausage Makers has a 3 L capacity, 2 fill rates, 2 speeds, and 4 stainless steel nozzles measuring 16 mm, 22 mm, 32 mm, and 38 mm.
Its 3 L size can be easier to manage when you make modest batches or have less room for storage. The trade-off is that you may need to reload it sooner during a large sausage-making session.
Both Hakka models use stainless steel for the base plate, cylinder, stuffing tubes, and canister. Their pistons include an air release, which supports the same basic goal of reducing trapped air during filling.
Can a jerky gun fill sausage casings?
A jerky gun can help with smaller sausage-making tasks when its nozzle and meat mixture suit the job. It requires finely minced meat and a mixture that is not too wet, because large pieces can block the nozzle and excess liquid can leak during pushing.
The TENICPS Professional Jerky Gun Kits includes a food-grade 304 stainless steel jerky gun, 5 stainless steel nozzles, 5 cleaning brushes, 1 stainless steel meat pusher, a pair of reusable kitchen rubber gloves, a user manual, and packaging.
The TENICPS uses food-grade 304 stainless steel, aluminum alloy, and plastic. Its 5 nozzles allow different shapes, but the hand-squeeze design provides a different filling motion from a cylinder-and-crank stuffer.
Choose it when compact hand operation and multiple nozzle shapes matter. Choose a dedicated manual sausage stuffer when you want a cylinder for holding a larger meat mixture and a crank for steady pressure.
For readers who prefer powered filling, our guide to the best electric sausage stuffer covers a different setup. A commercial sausage stuffer may suit larger production needs, while a sausage stuffer gun focuses on hand-operated portions.
How do you twist and portion the sausage?
Fill a manageable length, stop the crank, and twist the casing with light, even pressure. Leave a small amount of space between links so the casing can turn without bursting.
Decide on the link length before you start. Marking the spacing mentally or using a consistent hand position can make the batch look more even.
Twist neighboring links in alternating directions. This helps keep earlier links closed while you form the next one.
If you plan to coil the sausage, fill the casing in one longer section and coil it gently instead of making individual links. Keep the casing supported on a clean tray as it leaves the nozzle.
Don't overfill the casing to make a firmer-looking link. The casing needs room to contract during twisting and later cooking.
How do you clean and store a manual sausage stuffer?
Clean food-contact parts soon after use, rinse away residue, and dry every part before storage. Meat left in the cylinder, piston, nozzle, or seal can become harder to remove and may affect the next batch.
Disassemble the cylinder, piston, nozzle, and other removable food-contact parts according to the equipment instructions. Use the supplied brushes where narrow openings need extra attention.
Wash the parts with suitable soap and water, rinse thoroughly, and dry them fully. The TENICPS kit includes 5 cleaning brushes for reaching corners and nozzle openings.
Do not store damp stainless steel parts in a closed container. The TENICPS care guidance specifically says to dry the jerky gun thoroughly after cleaning to help reduce rust risk from prolonged moisture exposure.
Inspect the casing path before the next use. Remove dried residue, check that seals sit correctly, and confirm that the crank or handle moves without unusual resistance.
Which manual sausage stuffer should you choose?
For how to use a manual sausage stuffer, choose a cylinder-and-crank model when you want steady hand control over casing fill. Pick the Hakka 11 Lb/5 L model for a larger 5 L cylinder, the Hakka 7Lb/3L model for a smaller 3 L setup, and the TENICPS gun for compact hand operation with 5 nozzles.
A vertical stuffer can make the cylinder easier to load and gives you a direct crank routine. Compare vertical sausage stuffers when footprint and cylinder position matter.
Use your casing size to choose the nozzle, pack the meat firmly without trapping air, and turn the crank at a steady pace. If you're watching for a sausage stuffer on sale, keep capacity, nozzle sizes, cleaning needs, and storage space in view instead of choosing on price alone.
Frequently asked questions
How full should a sausage casing be?
Fill the casing firmly but leave enough flexibility to twist links without splitting. The correct fill level depends on the casing and sausage style, so begin with moderate pressure, watch for air pockets, and adjust the crank speed as the casing fills.
Why does meat come out unevenly from a manual sausage stuffer?
Uneven filling usually comes from trapped air, inconsistent crank speed, a casing that is not positioned correctly, or meat that is too warm or poorly mixed. Pack the cylinder in firm portions, remove visible air pockets, and guide the casing with steady tension.
What size nozzle should I use for sausage?
Choose the nozzle that matches the casing diameter and the sausage style. Smaller nozzles suit thin links, while larger nozzles suit thicker sausages.
Check the casing size before loading the stuffer, and avoid forcing a casing over a nozzle that is too large.
How do you clean a manual sausage stuffer?
Disassemble the food-contact parts according to the equipment instructions, remove meat residue promptly, wash the parts with suitable soap and water, rinse them well, and dry them fully before storage. Pay close attention to the piston, nozzle, cylinder, and seals.