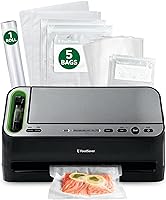
How to Use a FoodSaver Vacuum Sealer
To use a FoodSaver vacuum sealer, place food in a compatible bag, position the open end in the vacuum chamber, close the lid, and start the vacuum-and-seal cycle. Choose the correct setting for dry or moist food, then check that the finished seal is smooth and airtight.
On this page (8 sections)
- How do you use a FoodSaver vacuum sealer step by step?
- What do the FoodSaver controls do?
- How do you vacuum seal moist food with FoodSaver?
- How do you make a bag from a FoodSaver roll?
- How should you position a FoodSaver bag?
- What should you do after the bag seals?
- Why is a FoodSaver not sealing or vacuuming?
- Which FoodSaver setup should you choose?
To use a FoodSaver vacuum sealer, place food in a compatible bag, position the open end in the vacuum chamber, close the lid, and start the vacuum-and-seal cycle. Choose the dry or moist setting that matches the food, then check the finished seal before storing the package.
The basic process is the same across many FoodSaver machines. The controls and bag-detection features can vary, so follow the model manual when a button or indicator differs.
How do you use a FoodSaver vacuum sealer step by step?
The correct sequence is fill, position, close, vacuum, seal, and inspect. Keep the open end of the bag flat and free of food, liquid, wrinkles, and grease.
- Put the food into a FoodSaver bag or a compatible vacuum-seal bag.
- Leave enough empty space at the top for the machine to grip and seal.
- Place the open end inside the vacuum chamber.
- Close and lock the lid if your model requires it.
- Select Dry or Moist when those controls are available.
- Press the vacuum-and-seal or equivalent automatic cycle button.
- Wait until the cycle finishes before opening the lid.
- Check that the seal is continuous, smooth, and firmly closed.
Food should not cover the sealing area. If the bag is too full, move some food to another bag instead of forcing the opening into the chamber.
For a model-specific walkthrough, see how to use the FoodSaver VS2200 vacuum sealer.
What do the FoodSaver controls do?
The main controls start vacuuming, heat-seal the bag, or select the food type. Some models also include controls for sealing without vacuuming, cancelling a cycle, or using accessories.
A vacuum-and-seal button removes air and then closes the bag with heat. A seal-only control is useful for closing a bag without removing air, such as when you want to stop a cycle or make a bag from a roll.
Use Dry for solid foods with little or no free liquid. Use Moist for foods that may release liquid during vacuuming, but keep the liquid below the sealing area.
A Pulse or manual vacuum control, when included, gives you more control around soft foods. Stop the vacuum before delicate food is crushed, then use the seal control.
FoodSaver models can have different button names and light patterns. If the controls do not respond, check that the lid is locked and the bag is positioned correctly.
How to vacuum seal with FoodSaver for dry food
Choose Dry for solid, low-moisture foods such as portions of meat, hard cheese, or dry pantry items. Arrange the contents in a flat layer so the bag can collapse evenly.
Keep sharp bones, shells, or corners away from the bag walls. Wrap sharp edges when needed, because a puncture can let air back into the package.
The FoodSaver FM2100 includes one-touch sealing, roll storage and a cutter, plus Dry and Moist food use. Its starter items include an 11 in x 10 ft vacuum-seal roll, 3 1-quart bags, 2 1-gallon bags, and an accessory hose.
The FM2100 suits you if you want to make custom bag lengths from a roll and store portions in the fridge, freezer, or pantry. Its 16.3 in L x 9.2 in W x 4 in H size is worth checking against your counter and storage space.
How do you vacuum seal moist food with FoodSaver?
Use the Moist setting for foods that contain some liquid, and keep the liquid away from the bag opening. Liquid pulled into the sealing area can interfere with a strong closure.
Chill moist food before sealing, and place the food so the open end stays higher than the liquid. If liquid begins moving toward the seal, stop the cycle if your machine allows it and wipe the sealing area clean.
Do not rely on vacuum sealing as a substitute for safe refrigeration or freezing. The USDA explains that vacuum packaging changes the storage environment, so follow safe handling, chilling, and storage guidance in its food safety guidance for vacuum packaging.
The MEGAWISE Updated Vacuum Sealer Machine has Dry, Moist, Vac Pulse, and Seal modes. It also includes a 12 in sealing wire, a built-in cutter, 10 vacuum bags, and a vacuum hose for storage jars and wine bottles.
MEGAWISE lists the machine at 15.2 in L x 4.1 in W x 2.3 in H and 2.3 lb. Its compact size suits limited counter space, while the Vac Pulse mode can help reduce the chance of pulling juice from marinated food.
How do you make a bag from a FoodSaver roll?
Seal one end of the roll first, cut the length you need, then fill the new bag. Leave extra room at the open end so the machine can remove air and create the final seal.
Place the roll across the cutter or roll-storage area if your model includes one. Make a straight cut, then position the cut edge in the sealing area and run a seal-only cycle.
After the first end is sealed, check the seam before adding food. Fill the bag without stretching it, wipe the inside of the opening, and place the remaining open edge in the vacuum chamber.
The FoodSaver V4400 includes built-in roll storage and a cutter. Its starter kit has an 11 in x 10 ft roll, 3 1-quart vacuum-seal bags, 2 1-gallon vacuum-seal bags, 3 1-quart zipper bags, and 2 1-gallon zipper bags.
The V4400 suits households that want standard vacuum sealing plus FoodSaver zipper-bag and container use. It measures 11 in L x 20 in W x 12 in H and works with FoodSaver 8 in and 11 in rolls, premade bags, FreshSaver zipper bags, fresh containers, and the Quick Marinator.
How should you position a FoodSaver bag?
Keep the bag opening flat inside the vacuum chamber, with no food or wrinkles across the sealing path. The bag must stay open enough for air to leave while the machine runs.
Do not push the bag so far inside that food touches the sealing strip. Do not leave the opening outside the chamber, because the machine may not remove air or form a seal.
For a reliable seal, fill the bag on a flat surface and smooth the top edge before placing it into the machine. Wipe away moisture or food residue from the inside of the opening.
If the machine has automatic bag detection, place the opening in the chamber and let the machine begin its programmed process. Keep your hands clear of the lid and sealing area during operation.
What should you do after the bag seals?
Inspect the seal and the bag before storing the food. The seam should run across the full width without gaps, folds, or trapped food.
If the seal looks weak, cut it off and create a new seal above the first one if enough bag material remains. Leave extra space when repacking, and avoid stretching the film around bulky food.
Store sealed food according to the food's normal safety requirements. Vacuum sealing can reduce air exposure, but it does not make perishable food safe at room temperature.
For an explanation of the heating and air-removal process, read how exactly a vacuum sealer creates a seal.
Why is a FoodSaver not sealing or vacuuming?
Most failures come from bag position, an incomplete lid closure, a punctured bag, or a dirty or damaged gasket. Check those areas before changing settings or replacing supplies.
If the machine removes air but does not close the bag, inspect the sealing strip and make sure the bag opening is flat. Our guide to why a FoodSaver vacuum sealer is not sealing covers weak seams and failed heat seals.
If the machine does not remove air, reposition the bag and press the lid closed while checking for wrinkles. The guide to why a FoodSaver vacuum sealer is not vacuuming covers leaks, lid pressure, and gasket checks.
Use only bags and accessories that suit the machine. For a different brand's controls and setup, compare these instructions for using a NutriChef vacuum sealer.
Which FoodSaver setup should you choose?
For how to vacuum seal with FoodSaver, start with the standard sequence: use a correctly sized bag, keep the opening clean, choose Dry or Moist, and let the full cycle finish.
Choose the V4400 if automatic bag detection, roll storage, the cutter, and broader FoodSaver accessory compatibility fit your routine. Choose the FM2100 if one-touch sealing and custom bag sizing matter most.
Choose the MEGAWISE machine if compact storage and Dry, Moist, Vac Pulse, and Seal controls are more useful than staying within the FoodSaver system. Whichever machine you use, inspect every seal and keep perishable food chilled or frozen.
Frequently asked questions
How do you use a FoodSaver vacuum sealer?
Place food in a compatible bag, leave space at the open end, and put that end into the vacuum chamber. Close the lid, choose the correct dry or moist setting, and start the vacuum-and-seal cycle.
Let the seal finish before opening the machine and checking the bag.
Do you seal the bag before or after vacuuming?
FoodSaver machines remove air first and then heat-seal the bag during the same automatic cycle. If you are making a bag from a roll, seal one end before adding food.
After filling it, place the open end in the chamber and run the vacuum-and-seal cycle.
Can you vacuum seal liquids with a FoodSaver?
Use the moist setting for foods with some liquid, but keep liquid from reaching the sealing area. Freeze very wet foods first or use a method approved by your manual.
A chamber machine is better suited to larger amounts of liquid, as explained in our guide to whether a chamber vacuum sealer can seal liquids.
Why is my FoodSaver vacuum sealer not vacuuming?
A FoodSaver may fail to vacuum when the bag opening is outside the chamber, the lid is not fully closed, the bag has a hole, or the gasket cannot form an airtight seal. Reposition the bag, press the lid closed, and inspect the bag and gasket before trying again.