Canning Supplies: The Complete Buying Guide
What do I need for canning starts with a canner, jars, lids, rings and basic tools: choose pressure canning for low acid foods and water bath canning for high acid foods, then add a rack, funnel, jar lifter and lid lifter. The right setup depends on the food you plan to preserve first.
On this page (9 sections)
- What do I need for canning when you are just starting out?
- What types of canning jars should you buy first?
- Do I need to boil canning lids before use?
- What do I need to start canning with a water bath canner?
- What size pressure canner do I need for low acid foods?
- Which racks, funnels and lifters do you actually need?
- How do jar vacuum sealers and storage fit into canning?
- How should you set up, use and care for your canning gear?
- What should you buy first, and what can wait?
What do I need for canning starts with a canner, jars, lids, rings and a small set of handling tools. You do not need a full pantry of gadgets to start, and you do need the method that matches your food.
A simple starter setup works best when each item has a clear job. The canner handles heat and pressure, while the jars and lids hold the food through processing and storage.
Low acid foods like vegetables, meats, poultry and broths need pressure canning. High acid foods like jams, jellies, pickles and many tomatoes need water bath canning.
That single choice shapes the rest of what you buy.
The food list you write first will save you from buying the wrong pot. Pressure canning and water bath canning use different equipment, temperatures and timing, so they are not interchangeable for every recipe.
A small set of handling tools covers the steps between filling and cooling. A funnel helps you fill jars cleanly, and a jar lifter lets you move hot jars without gripping them with towels.
A bubble remover or headspace tool helps you release trapped air and check the gap between food and rim. That headspace is not a guess, since the recipe sets it for safe sealing.
A rack belongs under every batch inside the canner. It keeps jars off the bottom, limits clinking and allows water or steam to move around each jar during processing.
This guide covers the full canning supplies category in one place. It links to every topic cluster we publish, from jars and lids to racks, funnels, lifters, labels and storage.
Start with the canner decision, then build outward with tools you will use on every batch.
Those linked guides are useful after your first purchase, not before it. They help you compare sizes and styles once you know which foods and jar sizes you use most often.
We compared the main equipment types and checked the specs for the example products below. Scores weigh specs, features and buyer feedback against what a new canner needs first.
Capacity is a practical starting point for the comparison. A larger canner suits harvest days and bulk buys, while a smaller model suits weekly batches and limited counter space.
Stovetop type and storage space also affect the right choice. Measure your burners, cabinets and shelves before you order, since a canner that is hard to store is easy to postpone.
Setup matters as much as the model itself. A clean work surface, hot soapy water, a towel and your tested recipe should be ready before the canner starts to heat.
Care after the batch helps the next batch go smoothly. Wash the pot, rack and tools, dry them well and store lids and small parts where they will not bend or rust.
Start with one method and one jar size that match your first recipe. Learn that routine well, then add a second method or size when your food list grows.
What do I need for canning when you are just starting out?
You need a canner, jars with new lids and rings, a rack, and tools to fill, seal and lift jars. A starter kit is the fastest way to get those basics in one box.
A best canning starter kit helps you avoid buying duplicate tools. Look for a kit that includes a funnel, a jar lifter, a bubble remover or headspace tool, a lid lifter and a jar wrench.
Jars and lids are separate from the kit on many lists. Buy the jar size your recipes call for, most often pint and quart jars for everyday use.
Half pint jars work well for jams and small portions.
New lids matter because the seal compound is single use. Rings can be reused if they are not rusted or bent, but lids should be new for each batch.
Labels help you track what is inside and when it was made. Our best canning jar labels guide covers options for pantry rotation and gift jars.
A lid opener sounds minor until you open a tight jar at the table. A best canning jar lid opener is a low cost tool that saves effort on sealed jars.
Before you buy, write down the first three foods you want to make. That list tells you whether you need pressure canning, water bath canning, or both.
What types of canning jars should you buy first?
You should buy mason style jars in pint and quart sizes for most home recipes. Quart jars suit soups, broths and vegetables, while pints suit sauces, pickles and fruit.
Jar size affects processing time, so follow the recipe for the exact size. Do not switch from pints to quarts and keep the same time.
Wide mouth jars make filling and cleaning easier for chunky foods. Regular mouth jars work well for jams, jellies and liquids.
Our best mason jars for canning guide explains jar types, capacities and what to check before you buy a case. Start with a quantity that matches your canner rack, since one batch should fill the canner without crowding.
A rack keeps jars spaced and off the bottom of the canner. That spacing lets water or steam circulate and reduces breakage from clinking.
If you plan small batches of jam or jelly, half pint jars save space and reduce waste. If you cook for a larger household, quarts make more sense.
Buy lids and rings in the same mouth size as your jars. Mixed sizes create extra parts and more chances to grab the wrong ring during a busy batch.
Do I need to boil canning lids before use?
You should follow the lid maker's directions for your brand rather than boiling by habit. Many current lids are designed to go on dry or to be warmed in hot water, not boiled.
Boiling can damage the seal on some lids and shorten their life. Check the package for your specific lids before your first batch.
That check takes less time than replacing a case of lids that did not seal. It also prevents the common habit of treating every brand as if it needed the same prep.
What matters more is a clean jar rim, correct headspace and a ring tightened fingertip tight. Overtightening can prevent the jar from venting during processing.
A clean rim gives the lid a flat surface to seal against. Food, seeds or moisture on the rim can create a gap that is hard to see after the jar cools.
Headspace works with that clean rim during heating and cooling. The recipe sets the space for expansion, venting and the vacuum that forms as the jar rests.
A fingertip tight ring holds the lid in place without locking it down. The jar still needs to vent during processing, so extra force on the ring can work against the seal.
Our best canning lids and rings guide covers sizing, reuse rules for rings and how to tell if a ring is worn. When in doubt, replace bent or rusted rings.
Rings and lids must match the mouth size of your jars. Regular mouth and wide mouth parts do not swap cleanly, even when the diameter looks close in a drawer.
Lids are single use because the sealing compound is made for one processing cycle. Rings can be reused when they stay smooth, round and free of rust or bends.
Keep a few spare lids and rings on hand for a full batch. A bent ring found at filling time is easy to replace, but it is a distraction once jars are hot.
After processing, jars should cool undisturbed for 12 to 24 hours. Check seals, remove rings for storage and label each jar before it goes on the shelf.
Cooling on a towel or rack avoids sudden temperature changes. Moving jars too soon can shift lids before the seal has set, so a quiet rest helps the batch finish.
Removing rings for storage lets you spot a seal that fails later. A ring left in place can hold a loose lid against a jar that is no longer sealed.
A magnetic lid lifter keeps lids off the counter and out of your hands while they are hot. Our best canning lid magnet guide covers sizes and styles for that job.
That tool is handy when you prep many jars in a row. It keeps lids clean, reduces burns and makes the sealing step calmer during a busy batch.
What do I need to start canning with a water bath canner?
You need a large pot, a rack, a lid and enough water to cover jars by 1 to 2 inches. A water bath canner is the classic choice for high acid foods.
Foods that suit this method include jams, jellies, pickles, salsa and many fruit recipes. Low acid foods do not belong in a water bath, even if the jar looks sealed after cooling.
The rack is not optional. Jars need to sit on a rack so they do not touch the pot bottom and so water can circulate around them.
Our best water bath canner rack guide covers rack fit, height and material. A rack that is too small can cause jars to tip or strike each other.
For a wider view of pot options, see our best water bath canner roundup. Compare capacity, rack design and stovetop limits before you choose.
Granite Ware water bath setup for beginners
The Granite Ware set suits beginners who want a pot, rack and basic tools together. It is a 21.5 quart enamelware water bath canner with a lid and an 8 piece toolset.
The rack is rust proof chromed steel and holds jars with spacing for water circulation. That capacity fits a full load of quarts or a larger number of smaller jars.
The toolset includes a bubble remover and ruler, a jar lifter, a magnetic lid lifter, a jar wrench and a funnel for standard and wide mouth jars. Those five tools cover the main handling steps in a water bath batch.
Granite Ware says this set is not suitable for glass cooktops or induction stovetops. Check your stovetop type before you order, since that limit can rule out an otherwise good fit.
The pot is 4 pounds and measures 14.17 by 14.17 by 10.35 inches. That size needs cabinet space and stove room, so measure both before it arrives.
Supa Ant water bath setup with more tools
The Supa Ant set suits buyers who want a larger pot and a fuller tool list in one box. It is a 24 quart water bath canning pot with rack and lid, plus starter kit tools.
The pot has a porcelain enamel surface with a steel core and is described as PFOA and PTFE free. Supa Ant says it is not suitable for induction or glass cooktop hubs.
The kit includes a canning funnel, jar lifter, bubble popper, magnetic lid lifter, jar wrench, canning tongs, a half pint scoop, 6 measuring cups and homemade labels. That list covers filling, sealing, lifting and organizing in one purchase.
The pot measures 14 by 14 by 12.4 inches and weighs 10 pounds. A larger pot holds a bigger batch, but it also needs more water, more stove space and more storage room.
Supa Ant says the set is assembled in the USA and carries a 365 day back warranty. Check the current warranty terms on the product page before you buy, since terms can change.
What size pressure canner do I need for low acid foods?
You need enough room for your largest planned batch, with space for jars to sit on a rack. Pressure canning is the safe method for vegetables, meats, poultry, seafood and broths.
Our pressure canner vs water bath canner guide explains the food safety split in detail. If your list includes low acid foods, pressure canning must be part of your setup.
A larger canner saves time when you process a garden harvest or a bulk meat purchase. A smaller canner uses less water and storage space for weekly cooking.
Our best pressure canner pot guide covers stovetop models, capacities and gauge types. Altitude affects pressure settings, so a dial gauge can help you set processing pressure correctly.
For electric options, our best electric pressure canner guide explains presets, safety locks and jar counts. Electric models reduce stovetop monitoring and can work well in small kitchens.
Replacement parts wear over time, especially gaskets and gauges. Our best pressure canner replacement parts guide helps you keep a canner in service instead of replacing it early.
Presto 16 quart stovetop pressure canner
The Presto 01755 suits experienced home canners who want a large stovetop canner for regular harvests. It is a 16 quart aluminum pressure canner and cooker with a dial gauge.
Presto describes pressure canning as the method recommended by the U.S. Department of Agriculture for vegetables, meats, poultry and seafood.
That guidance is the reason low acid foods need this equipment.
The canner also works as a boiling water canner for fruits, jams, jellies, pickles and salsa in half pint and pint jars. That dual use can reduce the need for a second pot if you cook high acid foods in smaller jars.
It works on gas, electric and smooth top ranges. The dial gauge registers processing pressure, which matters more at higher altitude where settings change.
The air vent and cover lock allow pressure to build only when the cover is closed properly. The cover cannot open until pressure is safely reduced, and the vent gives a visual sign of pressure inside.
It includes a cooking and canning rack and an 80 page instruction and recipe book. The canner weighs 10.5 pounds and measures 13.5 by 17.25 by 12 inches, so it needs a large burner and cabinet space.
NESCO 9.5 quart electric pressure canner
The NESCO NPC-9 suits beginners and small batch canners who want electric controls. It is a 9.5 quart stainless steel smart electric pressure canner and cooker with digital controls.
NESCO says it automatically regulates pressure and temperature for vegetables, meats, broths and sauces. That automation reduces the stovetop guesswork that can trouble first time pressure canners.
It has pressure cook, slow cook, steam and water bath modes in one appliance. You can switch from preserving a harvest to cooking soups, stews and jams without moving to a second pot.
The digital display with presets and a timer delivers repeatable cycles for multiple jars. A safety lock lid, automatic float valve and pressure regulation system help prevent opening under pressure.
The 9.5 quart removable nonstick inner pot holds multiple jars per batch and simplifies cleanup. Included parts are a canning rack, a steam rack and a removable condensation catcher.
It weighs 22 pounds and measures 14.17 by 15.27 by 16.53 inches. That footprint suits a countertop or utility space, but it will not match a large stovetop canner for jar count.
Which racks, funnels and lifters do you actually need?
You need a rack that fits your canner, a funnel that fits your jar mouth, and a lifter that grips hot jars safely. Those three tools affect every batch more than extra gadgets do.
A rack must match your pot diameter and jar height. Jars need headroom under the lid, and water needs room to cover them in a water bath.
Our best canning rack for stock pot guide covers using a stock pot for water bath canning. A stock pot can work if it is deep enough and you add a proper rack.
For small jars, a best canning rack for small jars helps keep half pints and quarter pints stable. Small jars tip more easily and need tighter spacing.
Silicone racks are an option in our best silicone canning rack guide. Compare heat limits, fit and cleaning before you choose silicone over metal.
Funnels cause most filling messes when the size is wrong. Our best canning funnel for mason jars guide covers regular and wide mouth fit.
For chunky foods, a best canning funnel with strainer can separate pulp or seeds while you fill. For a long term option, our best stainless steel canning funnel guide covers durability and cleaning.
A jar lifter grips the jar body so you can move it level from the canner to a towel. Our best canning jar lifter guide covers grip styles and jar sizes.
A broader accessory list lives in our best canning jars accessories guide. Use it to fill gaps after your first batch shows what you missed.
How do jar vacuum sealers and storage fit into canning?
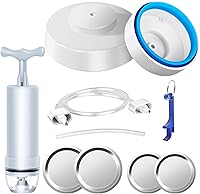
Jar vacuum sealers are dry storage tools, not canning tools. They remove air from dry goods in mason jars for pantry storage.
A best mason jar vacuum sealer can help with dry beans, grains, flour and other low moisture foods. It does not replace pressure canning or water bath canning for moist foods.
That distinction matters for safety. Vacuum sealed dry goods stay dry, while canned foods need heat processing to reach safe conditions.
A sealer works after the food is already dry and shelf stable. It protects that dry food from air and moisture in the jar, but it cannot make a wet food safe.
Canning works in the opposite direction for moist foods. Heat, time and pressure or boiling water do the safety work, and the seal forms as the jar cools.
Use each tool for its own job and the pantry stays simpler. Dry goods go into vacuum sealed jars, and cooked or raw moist foods go through a tested canning recipe.
After canning, storage containers protect finished jars from dust and damage. Our best canning jar storage containers guide covers stacking, handles and shelf use.
Good storage also protects labels and lids from knocks. A sturdy container with a lid keeps jars from sliding when shelves are crowded.
Store sealed jars in a cool, dark place away from heat and light. Remove rings before storage so a failed seal does not stay hidden under a ring.
Label each jar with contents and date before it goes on the shelf. Rotate older jars to the front so you use them first.
Keep a simple inventory list for your pantry. That list saves time when you plan meals and shows which foods you should make more of next season.
How should you set up, use and care for your canning gear?
You should set up a clean work area with jars, lids, tools and recipes within reach before you start heating water. Canning moves fast once the canner is hot, and a tidy station prevents spills and mistakes.
Wash jars, lids and tools in hot soapy water and rinse well. Keep jars hot until filling so they do not crack from temperature shock.
Fill jars to the headspace in your recipe. Use a bubble remover to release trapped air, then wipe rims clean before you add lids.
Add rings fingertip tight and process for the full time at the correct pressure or boil. Do not shorten time, and do not change jar sizes without adjusting the recipe from a tested source.
After the timer ends, let pressure drop naturally in a pressure canner or let a water bath rest before you lift the lid. Move jars to a towel or rack and leave them undisturbed while they cool.
Check each seal after 12 to 24 hours. Jars that did not seal can be reprocessed within the window in your recipe or used fresh in the refrigerator, based on tested guidance.
Wash the canner, rack and tools after each batch and dry them fully. Store gaskets, gauges and small tools separately so they do not get bent or lost.
Our steam canner for canning guide covers a lower cost option for high acid foods. A steam canner uses less water than a water bath, but it has limits on jar size and food type.
If you are torn between canner types, our pressure canner vs pressure cooker guide explains the overlap and the key differences. A pressure cooker is not always a pressure canner, even if the pots look alike.
What should you buy first, and what can wait?
You should buy the canner, jars, lids, rings, rack and core tools first, then add storage and labels. That order gets you canning safely without overspending on extras.
Start with one method and one jar size. Learn that process well, then add a second method or size when your food list grows.
A starter kit plus jars and lids is a solid first order for most beginners. Add a lid opener, labels and storage containers after your first batch, when you know your habits.
Compare kits in our best canning starter kit guide before you buy a bundle. A kit that matches your canner and jar sizes saves more money than a long tool list.
Pick the Presto 01755 if you want a large stovetop pressure canner for regular harvests. Pick the NESCO NPC-9 if you want electric controls for smaller batches.
Pick the Granite Ware set if you want a water bath pot with core tools for a mid size batch. Pick the Supa Ant set if you want a larger water bath pot with a fuller tool list.
Measure your stove, cabinets and storage shelves before you order any canner. A canner that fits your kitchen will get used more often than a larger model that stays in a garage.
Revisit headspace, seals and storage after each batch. Those habits matter more than owning every accessory in the category.
Frequently asked questions
What do I need for canning at home?
You need a canner matched to your food, plus jars, lids, rings, a rack, a funnel, a jar lifter and a lid lifter. Pressure canning suits vegetables, meats and broths, while water bath canning suits jams, pickles and other high acid foods.
Start with one method and add tools as you learn.
What do I need to start canning safely?
Start with a tested recipe, the correct canner for that food, clean jars, new lids and rings, and enough water for full processing. Edison timing and headspace matter more than extra gadgets.
Keep a rack under jars so they do not rest on the canner bottom or strike each other.
What size pressure canner do I need?
Pick pressure canner size by your largest batch and jar mix, not by cabinet space alone. A 16 quart canner can hold 7 quart jars, 10 pint jars or 12 half pint jars in Presto sizing, while a 9.5 quart electric model fits smaller batches.
Larger loads save time, but they also need more storage and stove room.
Do I need to boil canning lids before use?
Follow the lid maker's directions for your brand, since many current lids do not need boiling and some should stay dry until use. Boiling can damage the seal compound on some lids.
The key step is using new lids, clean rings and jars, then processing for the full time in a tested recipe.