Why Is Your FoodSaver Vacuum Sealer Not Sealing?
A FoodSaver vacuum sealer usually fails to seal because the bag opening is misaligned, wet, wrinkled, punctured, or not fully inside the vacuum chamber. Check the heat strip, gasket, lid, and bag before trying another cycle.
On this page (8 sections)
- Is the FoodSaver bag positioned correctly?
- Could moisture be stopping the heat seal?
- Is the heat strip clean and undamaged?
- Is the lid or gasket preventing an airtight chamber?
- Can a damaged bag cause the problem?
- Which FoodSaver product helps with sealing problems?
- What should you do if a FoodSaver seals but will not vacuum?
- When should you replace the bag or stop troubleshooting?
A FoodSaver vacuum sealer usually stops sealing because the bag opening is wet, wrinkled, punctured, or positioned incorrectly. Check the bag, heat strip, gasket, lid, and moisture before assuming the machine has failed.
A good seal needs a flat bag opening, enough empty space above the food, and an airtight vacuum chamber. When any part of that setup changes, the machine may still run a cycle without producing a seal that holds.
This is common with everyday use. Crumbs near the opening, a slightly folded edge, or liquid that has reached the sealing area can interrupt the heat bond and leave a weak section.
It also happens with frozen and moist foods. A bag that looks fine at first glance may have a small puncture or a thin spot that lets air back in after the cycle ends.
Air removal and heat sealing work as two separate parts. The vacuum pulls air from the bag, and the heat strip then fuses the plastic to keep air out.
For a quick overview of how exactly a vacuum sealer creates a seal, start with the relationship between those two steps.
If those two steps fall out of order, the result is often a bag that closes loosely or opens again in storage. The fix is usually a small correction to placement, dryness, or the chamber.
Start with the simplest checks before you cut bags or run another cycle. Smooth the opening, dry the sealing area, and confirm that nothing is caught under the lid.
Those early checks take only a minute. They also help you tell a setup issue from a true fault in the machine itself, so you can fix the cause instead of repeating the same failed cycle.
Is the FoodSaver bag positioned correctly?
The bag opening must sit flat inside the vacuum chamber, with the edge straight across the sealing area. If the opening is too far forward, too far back, or folded over, the machine may remove air without creating a reliable seal.
Open the lid and pull the bag straight. Smooth out wrinkles near the opening, then place the edge inside the chamber without blocking the lid or folding the plastic over itself.
Leave enough empty space above the food for the bag to reach the chamber. Food, crumbs, and liquid should stay below the sealing area.
If you need a full setup walkthrough, follow how to vacuum seal with FoodSaver before trying another cycle. The same alignment check applies to both rolls and pre-cut bags.
Could moisture be stopping the heat seal?
Moisture near the heat strip is one of the most common reasons a FoodSaver bag will not seal cleanly. Liquid can interrupt the bond or leave a weak section that opens later.
Pat wet food dry before placing it in the bag. For meat, fish, poached food, or other liquid-heavy items, chill or partly freeze the contents first so liquid is less likely to travel toward the opening.
Use a moist-food setting when your machine has one. The goal is to keep liquid away from the heat strip, not to force the machine to seal through a wet layer.
Check the drip area after sealing moist food. If your appliance has a removable drip tray, empty and clean it according to the care instructions before continuing.
Is the heat strip clean and undamaged?
A dirty, blocked, or damaged heat strip can leave gaps in the seal. Turn the machine off and let the sealing area cool before checking it.
Remove crumbs, food residue, and loose plastic from the strip with a soft, dry cloth. Do not place a bag across debris, since the obstruction can create an uneven seal.
Look at the finished line after each cycle. A good seal should be continuous rather than broken, folded, or visibly thin in one section.
Do not keep repeating cycles on a bag with a poor seal. Cut above the failed area, create a clean opening, and try again after fixing the cause.
Is the lid or gasket preventing an airtight chamber?
The lid must close fully, and the foam sealing gasket must sit evenly around the chamber. A loose, cracked, or deformed gasket can stop the machine from pulling enough air or completing the seal.
Close the lid firmly according to your model's instructions. Check that no part of the bag, food, or debris is caught between the lid and gasket.
Inspect the gasket for cracks, flattening, or sections that have pulled away from their channel. If it looks out of place, reseat it carefully and try again.
If the machine still will not seal, check the power cord and plug. Stop using the appliance if the cord is damaged.
Can a damaged bag cause the problem?
A hole or weak spot can make a successful seal appear to fail. Inspect the bag for punctures from bones, sharp edges, frozen food, or rough packaging.
Move sharp foods away from the plastic or use a protective layer that keeps the bag from being pierced. Keep the opening clean and straight when cutting a roll.
A bag that seals and then reopens may have a puncture away from the heat strip. Listen for air leaks and inspect the plastic before blaming the sealer.
For the difference between air removal and sealing, see what exactly is a vacuum sealing machine. The vacuum step cannot stay effective if the bag is damaged.
Which FoodSaver product helps with sealing problems?
The best choice depends on whether you want automatic bag handling, a compact standard sealer, or a small machine with dry and moist modes.
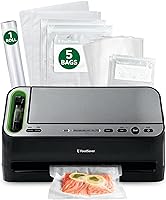
The FoodSaver V4400 2-in-1 Vacuum Sealer Machine with Automatic Vacuum Sealer Bag Detection and Starter Kit uses automatic bag detection and includes an 11 in x 10 ft roll, quart and gallon vacuum seal bags, and quart and gallon vacuum zipper bags. Its built-in roll storage and cutter help you make custom-sized bags.
The V4400 has automatic moisture detection, a removable dishwasher-safe drip tray, and compatibility with FoodSaver 8 in and 11 in vacuum seal rolls, pre-made bags, Freshsaver zipper bags, fresh containers, and the Quick Marinater. Its product data lists an 800-watt automatic system made of plastic.
The FoodSaver FM2100 Vacuum Sealer Machine, One-Touch Sealing, Roll Storage & Cutter, Dry & Moist Food, For Sous Vide Cooking, Accessory Port & Hose, Starter Bags & Roll Included has dual heat sealing strips and a built-in roll cutter. It includes an 11 in x 10 ft roll, 3 quart bags, 2 gallon bags, and an accessory hose.
The FM2100 is 16.3 in long, 9.2 in wide, and 4 in high. Its automatic system is made of plastic, uses 120 watts, and includes an accessory port and hose for compatible FoodSaver accessories.
The Updated Vacuum Sealer Machine 2025, MEGAWISE Food Sealer w/Starter Kit, Dry & Moist Food Modes, Compact Design with 10 Vacuum Bags & Built-in Cutter (Grey) measures 15.2 x 4.1 x 2.3 in and weighs 1.2 kg. It includes 10 vacuum bags and has a built-in cutter.
The MEGAWISE model has dry, moist, Vac Pulse, and Seal modes. Its product data lists 80 kPa suction power, a 12 in sealing wire, 110 watts, 120 volts, and a vacuum hose for storage jars and wine bottles.
What should you do if a FoodSaver seals but will not vacuum?
Check the chamber, bag placement, gasket, and punctures before replacing the machine. A sealing problem and a vacuum problem can share the same causes, but the fix may be different.
Make sure the bag opening is inside the chamber and the lid is fully closed. If the bag is smooth and correctly placed but the machine still will not remove air, see why your FoodSaver vacuum sealer is not vacuuming.
For a model-specific setup, how to use the FoodSaver VS2200 vacuum sealer covers the placement and operating sequence for that machine.
Treat vacuum and seal as separate checks. A machine can heat the plastic yet leave too much air inside, or it can pull air out yet leave a weak seal that fails later.
Start by opening the lid and checking where the bag actually sits. The opening should reach fully into the chamber, lie flat, and stay clear of folds, crumbs, and excess liquid.
Then check the gasket and the lid. A gasket that has shifted, flattened, or picked up debris can break the airtight chamber even when the bag looks correct.
Also inspect the bag for punctures, especially near sharp edges or frozen corners.
If those checks pass, try a fresh bag with dry food and a clean, dry sealing area. That test shows whether the issue follows a particular bag or affects every cycle.
Note what changes between attempts, such as air left in the bag, gaps in the seal line, or reopening after a short time. Placement and gasket issues are quick to fix, while repeated failures with a clean bag and correct setup may need model specific support.
When should you replace the bag or stop troubleshooting?
Replace the bag when it has a puncture, a folded opening, or a failed seal that cannot be trimmed away. Start with a fresh bag before deciding that the appliance needs service.
Stop and seek model-specific support if the gasket is cracked, the heat strip is damaged, the lid will not close, or the cord is unsafe. Do not keep running cycles that produce the same failed seal.
Choose the V4400 if automatic bag detection and moisture handling fit your routine. Choose the FM2100 for one-touch sealing and dual heat strips, or the MEGAWISE model if compact size and several sealing modes matter most.
A FoodSaver vacuum sealer not sealing is usually a setup, moisture, bag, or gasket problem. Work through those checks in order, then replace the bag before replacing the machine.
Frequently asked questions
Why is my FoodSaver vacuum sealer not sealing?
The most common causes are a bag opening that is outside the vacuum chamber, moisture on the sealing area, wrinkles across the opening, a punctured bag, or a lid that is not fully closed. Clean and dry the area, smooth the bag, reposition it, and run a seal cycle again.
Why does my FoodSaver seal but lose the vacuum?
A bag can lose its vacuum when the seal is incomplete, the bag has a hole, food or moisture crosses the sealing area, or the gasket cannot make an airtight chamber. Inspect the seal for gaps, trim the bag above the old seal, and try again with a dry, smooth opening.
How do I fix a FoodSaver bag that will not seal?
Cut off the damaged or wrinkled end and make a fresh opening. Keep the bag flat, leave enough empty space above the food, place the opening inside the vacuum chamber, and keep liquids away from the heat strip.
Use the correct dry or moist setting when available.
Why is my FoodSaver sealing wet bags?
Moisture can prevent a clean heat seal, especially when liquid reaches the sealing strip. Pat food dry, chill or partly freeze liquid-heavy food, leave more space at the top, and use a moist-food setting if your machine has one.
Wipe the drip area before sealing again.