How to Use a Handheld Vacuum Sealer
Place the sealer directly over the bag valve, run the pump until the bag is firm, then close the valve cap. Keep the valve and seal area clean and dry for a reliable seal.
On this page (11 sections)
- How do you use a handheld vacuum sealer step by step?
- Where should the handheld sealer sit on the valve?
- How do you operate the pump without crushing food?
- How do you seal reusable vacuum bags?
- How do you avoid leaks when sealing moist food?
- What should you do if the bag will not hold a vacuum?
- Which product suits a handheld vacuum sealing setup?
- Can a manual vacuum sealer help with soft or moist foods?
- How should you clean and store a handheld vacuum sealer?
- What is the safest way to use vacuum-sealed food?
- What is the best way to use a handheld vacuum sealer?
You use a handheld vacuum sealer by aligning its pump with the bag valve, removing air, and closing the valve cap. The bag must be fully closed, the valve must be clean and dry, and the pump must sit flat over the valve.
Handheld sealers are useful for reusable zipper bags, containers, and canisters with a compatible valve. They work differently from countertop machines that pull air through an open bag and heat-seal the edge.
For a wider introduction, start with What Do You Use a Vacuum Sealer for Beginners?. The basic preparation is the same: portion the food, keep the sealing area clean, and leave enough room to handle the bag.
How do you use a handheld vacuum sealer step by step?
Close the bag, align the pump, remove air, and shut the valve cap. Work on a flat surface so the valve stays covered while the pump runs.
- Place the food inside the reusable vacuum bag.
- Leave clearance around the valve and keep food away from the zipper.
- Close the zipper completely from one end to the other.
- Find the round valve on the outside of the bag.
- Open the valve cap if the bag has one.
- Place the handheld sealer directly over the valve.
- Press down gently to create contact.
- Run the pump until the bag is snug around the food.
- Stop before soft food is crushed or liquid reaches the valve.
- Remove the pump and close the valve cap.
- Check the bag after a few minutes for air returning.
The exact button or switch varies by model. Follow the instructions for your sealer if its controls or valve design differ.
For the basic air-removal process, see How Exactly Does a Vacuum Sealer Work Step by Step?.
Where should the handheld sealer sit on the valve?
The pump opening should cover the valve evenly with no visible gap. If it sits off-center, air can enter around the connection instead of leaving the bag.
Hold the bag flat under the pump. Press down with enough force to maintain contact, but don't bend the valve or squeeze the bag so hard that food blocks the air path.
A valve bag may have a soft silicone section, a removable cap, or a built-in one-way valve. Identify which part opens for suction and which part closes after pumping.
If you are unsure whether a tool uses a valve bag or a container attachment, read What Exactly Is a Handheld Suction Sealer?. Handheld suction sealers are not all shaped or connected in the same way.
How do you operate the pump without crushing food?
Use short pumping intervals and watch the bag as it tightens. Stop when the food is held in place and extra air has been removed, rather than continuing until every part is compressed.
Use lower suction for bread, berries, pastries, and other foods that can break under pressure. Keep sharp bones, shells, and hard edges away from the bag wall, or wrap them before sealing.
For meat, vegetables, and dry foods, arrange portions in a single layer where possible. For meal ideas, see recipes for a food vacuum sealer.
A flatter bag is easier to stack and gives the pump a clear path to the valve.
Don't lift the bag while pumping. Movement can break the pump connection and let air back in.
How do you seal reusable vacuum bags?
Close the zipper fully before vacuuming, then cap the valve immediately after removing the pump. A zipper that is partly open will let air enter even when the valve works correctly.
Run your fingers along the zipper after closing it. Check that no food, crumbs, grease, or moisture crosses the zipper track.
Keep the top section flat. If the bag is folded, the zipper may not close evenly and the valve may not sit level under the pump.
After sealing, press lightly around the edges and watch for air returning. A slow leak usually points to the zipper, valve cap, or a small hole in the bag.
Wash reusable bags according to their care instructions. Dry the inside fully before storing them or using them again, and discard bags with damaged seams or valves.
How do you avoid leaks when sealing moist food?
Keep liquid below the valve and chill wet food before vacuuming. Soup, sauce, marinades, and juicy meat can move toward the valve as air leaves the bag.
Freeze liquid foods until firm before sealing when the bag instructions allow it. For refrigerated foods, leave extra space above the food and stop the pump before liquid reaches the valve.
Use a container instead when the bag cannot keep liquid away from the pump. Never allow liquid to enter the handheld sealer.
For a marinade-specific method, read How to Use a Vacuum Sealer for Marinades. You can also compare how to use a Nesco vacuum sealer when your main machine has separate dry, moist, or gentle settings.
Which countertop product helps with regular bag sealing?
A countertop machine can help when you seal open-ended bags often, while a handheld sealer suits valve bags and containers. For regular portioning, compare vacuum sealers for food prepping.
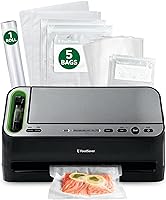
The FoodSaver V4400 includes an 11 in x 10 ft vacuum seal roll, 3 quart vacuum seal bags, 2 gallon vacuum seal bags, 3 quart vacuum zipper bags, and 2 gallon zipper bags. Its automatic operation can suit someone who wants both standard bag sealing and handheld access in one machine.
The unit is 11 in L x 20 in W x 12 in H and weighs 10 lb. Measure your counter and storage space before choosing a larger 2-in-1 system.
What should you do if the bag will not hold a vacuum?
Start with the zipper, valve, and bag surface. These are the parts that must stay airtight after the pump is removed.
Check each point in order:
- Run your fingers across the zipper to confirm it is fully closed.
- Clean crumbs, oil, and moisture from the zipper track.
- Make sure the valve cap is open while pumping.
- Center the pump over the valve.
- Inspect the bag for pinholes or stretched seams.
- Check whether food is pressing against the zipper.
- Close the valve cap immediately after pumping.
Test the bag again with less food if the first attempt fails. If air returns, transfer the food to an intact bag rather than repeatedly pumping a damaged one.
For a different brand's fault checks, see how to troubleshoot a LEM vacuum sealer. The same inspection order often helps identify a loose closure, poor alignment, or damaged bag.
Which product suits a handheld vacuum sealing setup?
Choose the FoodSaver V4400 if you want a combined countertop and handheld system with automatic bag detection and a starter assortment of bags and zipper bags. Choose the FoodSaver FM2100 if you mainly need a compact automatic machine with roll storage, a cutter, an accessory hose, and starter bags.
The FoodSaver FM2100 measures 16.3 in L x 9.2 in W x 4 in H and weighs 6.6 lb. Its package includes an 11 in x 10 ft vacuum seal roll, 3 quart bags, 2 gallon bags, and an accessory hose.
Its 120-watt automatic operation and dual heat sealing strips suit routine open-ended bag sealing. The title also identifies it for dry and moist food, but wet foods still need careful positioning so liquid does not reach the pump or seal area.
For a model-specific guide, see how to use a NutriChef vacuum sealer. Different controls and bag systems may require different steps.
Can a manual vacuum sealer help with soft or moist foods?
A manual sealer can help when you need control over suction and sealing strength. This is useful for soft foods or moist portions where full automatic suction may pull too hard or move liquid.
The NESCO Deluxe Food VS-12 measures 15.75 in L x 8 in W x 4.5 in H and weighs 6 lb. It includes an 8.6 in x 9.85 ft roll and an 11.8 in x 9.85 ft roll.
Its gentle vacuum option can suit bread, berries, or other soft foods that need less pressure. Its moist and double seal settings can help when you use a countertop bag, but they do not replace careful portion placement or safe food handling.
How should you clean and store a handheld vacuum sealer?
Keep the pump opening, valve area, zipper, and bag surface clean and dry. Unplug or switch off the device before wiping it, and follow the product instructions for removable parts.
Don't immerse an electric handheld sealer unless its instructions specifically allow it. Wipe away food residue before it hardens, and store the pump where its opening will not collect crumbs.
Dry reusable bags completely before storage. Keep them open while drying, then store them away from sharp utensils and rough cabinet edges.
When you compare vacuum sealer deals, check whether the package includes compatible valve bags, an accessory hose, or a starter roll. A lower-cost machine may not suit the bags you already use.
What is the safest way to use vacuum-sealed food?
Vacuum sealing slows air exposure, but it does not replace refrigeration, freezing, or safe cooking. Keep perishable food cold, label the bag with its contents and date, and follow safe storage times.
Don't leave meat, seafood, dairy, or cooked food at room temperature because it is vacuum sealed. Thaw sealed food using a safe method, and open bags carefully if pressure or liquid has collected inside.
Use a clean bag for ready-to-eat food. Keep raw meat separate from foods that will be eaten without cooking, and wash reusable bags according to their instructions before another use.
What is the best way to use a handheld vacuum sealer?
For how to use a handheld vacuum sealer, close the zipper first, center the pump over the valve, remove air in short intervals, and cap the valve as soon as the bag is firm. Keep moisture away from the valve and inspect the bag for leaks.
Choose the FoodSaver V4400 when you want one system with countertop and retractable handheld functions. Choose the FM2100 for compact automatic open-ended bag sealing, or the NESCO VS-12 when manual suction and gentle pressure matter most.
Frequently asked questions
How do you use a handheld vacuum sealer?
Place the handheld sealer over the bag's valve, press it down to make contact, and run the pump until the bag is tight around the food. Stop before crushing soft food, then close the valve cap and check the seal for leaks.
Why is my handheld vacuum sealer not removing air?
Check that the pump is centered over the valve and that the valve cap is open. Make sure the bag has no holes, the zipper is fully closed, and the valve and pump opening are clean and dry before trying again.
Can you reuse vacuum sealer bags?
Reusable zipper vacuum bags can be used again when they remain clean, intact, and suitable for the food being stored. Wash and dry them as directed, and avoid reusing a bag that held raw meat unless its care instructions allow it.
Can a handheld vacuum sealer seal liquids?
A handheld sealer can remove air from compatible containers or valve bags, but liquid can enter the pump if it reaches the valve. Chill or freeze wet foods first, leave space around the valve, and follow the bag or sealer instructions.